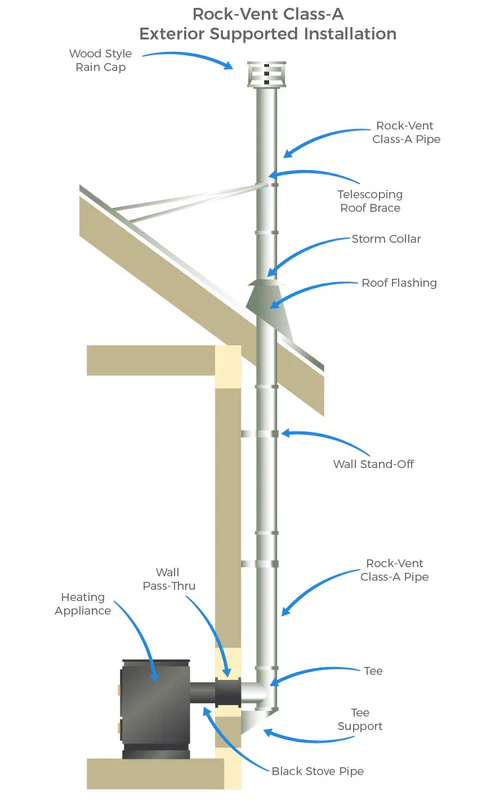
Double wall class
A installation

When the installation of a Class A chimney pipe system requires the chimney stack to run alongside the home, a Rock-Vent Through the Wall Kit (opens in a new tab) is the best option to make purchasing the bulk of the components easy and all in one kit. Though every Class A chimney installation is different, there are a few general items to take into consideration before you start the job to ensure you order the correct components
watch video

Contact Us
Call Me Back
Placement is the first item that must be taken into consideration. The placement of the Wall Pass Through is going to dictate the lengths of stove pipe versus the lengths of Class A chimney pipe needed. The higher you place the Wall Pass Through in the wall, the less insulated chimney pipe you will need. You will need to take into consideration the clearances required for the stove pipe in relation to the ceiling. Typically, single wall stove pipe must be 18"-20" away from a ceiling and double wall stove pipe must be 8"-9" from a ceiling
Wall Pass Through Placement


The wall thickness must be taken into consideration for any Through the Wall Kit. The Rock-Vent Wall Pass Through allows the Class A pipe to safely pass through the wall and can adjust from 4 to 8 inches. For thicker walls, such as foundation walls, a 12" wall pass through extension is available for additional adjustment. You must also look at the exterior siding material. For aluminum and vinyl exterior siding, the Siding Trim Kit must be installed over the cover plate of the Wall Pass Through to ensure the penetration is leak free.
Wall Thickness & Type
Once the Wall Pass Through is installed, you can start by installing the Tee Support that will bear the weight of the vertical section of chimney pipe. You must make sure the Tee Support is attached to a solid and sturdy wall. The Tee Support can adjust from 2" to 5" away from the wall and can support up to 60' of vertical pipe. As you add the vertical pipe sections, you must attach a Wall Stand Off (opens in a new tab) to the chimney pipe every 8' to help stabilize the flue pipe. Just like the Tee Support, the Wall Stand Off can adjust from 2" to 5" off of the wall. In the event the pipe is further from the side of the home, an Extended Wall Support is available to offer up to 14" of adjustment.
Exterior Supports
A roof will always overhang the side walls of the home. The roof will always overhang the walls more on the eave side of the home as opposed to the gable side. Most eaves overhang anywhere from 12" to 16". That large of an overhang will leave you with a long horizontal pipe which is not exactly helpful for draft. Offsetting elbows are available to alleviate the need for a long horizontal pipe.
Eave Overhang & Offsets
The offset elbows are available in 15 and 30 degree bends. The Rock-Vent Class A Elbow Kit (opens in a new tab) includes 2 elbows and an elbow support. The longer the pipe section you put in between the two elbows, the more offset you can achieve. You must also take into consideration your height restrictions. For instance, if you use a 36" length of pipe in between two 15 degree elbows, you will have a finished height of 44.375" for those three components. If the distance between the wall pass through and eave is less than the 44.375" you need to either use a 30 degree Elbow Kit or lower the Wall Pass Through on the wall. We offer an offset chart in the product details on the Elbow Kit page.

Chimney height building code reads you must be a minimum of 3' above the roof and 2' higher than any part of the roof within 10' horizontally. You can read more about the 10/3/2 chimney height rule in this article (opens in a new tab). When the chimney pipe is on the eave side, it will have to extend much higher over the roof compared to if it were on the gable side. If there is more than 5' of chimney pipe exposed above the roof, you need to make sure that you have the Rock-Vent Roof Brace Kit to provide extra support for the pipe.
Roof Clearance
Measuring Form and Parts List
These are a few important items to plan for when you are putting together your components for your Rock-Vent Class A chimney system (opens in a new tab). For optimal performance and safety, it is very important that you always follow the installation instructions.

Navigation
Privacy Policy
Services
Air duct & dryer vent cleaning
Now serving